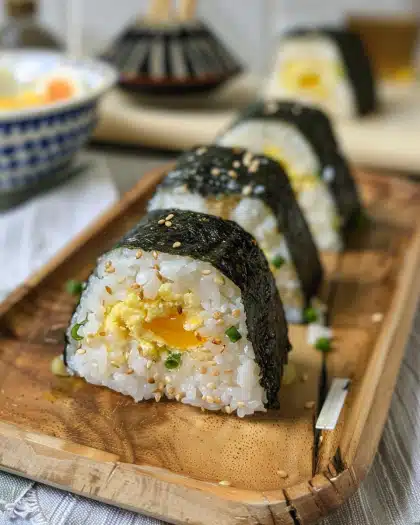
This delicious egg onigiri is a quick and flavorful twist on the traditional Japanese rice ball. With fluffy scrambled eggs, chives, and seasoned rice wrapped in roasted seaweed, it makes for a satisfying snack, breakfast, or lunch that’s both comforting and portable.
Why You’ll Love This Recipe
Egg onigiri is simple, nutritious, and perfect for beginners. It’s a great way to enjoy rice in a fun, handheld form, and the combination of soy sauce, sesame oil, and mayo adds rich umami flavor. Whether you’re making it for a lunchbox, picnic, or quick meal at home, this recipe is versatile and customizable.
Ingredients
(Tip: You’ll find the full list of ingredients and measurements in the recipe card below.)
-
2 eggs
-
10 g chives (or green onions)
-
1.5 tbsp mayonnaise
-
1 sheet roasted seaweed
-
300 g cooked white rice
-
2 1/2 tbsp soy sauce
-
1 tbsp sesame oil
Directions
-
Wash and finely chop the chives; set aside.
-
Crack eggs into a bowl, add a pinch of salt, and whisk.
-
Heat a pan over medium heat, coat with cooking oil, and pour in the eggs.
-
Scramble gently for 1 minute, breaking into small pieces with a spatula. Remove from heat.
-
In a large bowl, combine cooked rice, chives, scrambled eggs, sesame oil, soy sauce, and mayonnaise. Mix well with clean hands or gloves.
-
Cut roasted seaweed into small strips (about 5 cm x 8 cm).
-
Shape the rice mixture into balls, then flatten slightly and press into a triangular onigiri shape.
-
Wrap the bottom of each onigiri with seaweed and serve.
Servings and timing
-
Yield: 4 onigiri (1 serving)
-
Prep Time: 20 minutes
-
Cook Time: 5 minutes
-
Total Time: 25 minutes
Variations
-
Herb swap: Replace chives with green onions, parsley, or cilantro.
-
Spicy kick: Add chili flakes, sriracha, or wasabi mayo.
-
Protein boost: Mix in tuna, shredded chicken, or tofu along with the eggs.
-
Different rice: Try brown rice, multigrain rice, or even quinoa for a healthier twist.
-
Cheesy version: Add shredded cheese to the rice mixture before shaping.
Storage/Reheating
Wrap leftover onigiri tightly in plastic wrap and store in the refrigerator for up to 2 days. For best taste, bring to room temperature before eating. To reheat, warm gently in the microwave for 15–20 seconds and rewrap with fresh seaweed.
FAQs
What type of rice works best for onigiri?
Short-grain or sushi rice works best since it’s sticky and holds its shape.
Can I make onigiri without seaweed?
Yes, the seaweed is optional, but it helps hold the shape and adds flavor.
Do I need a mold to shape onigiri?
No, you can shape them by hand, though molds can make the process easier.
Can I pack these for lunch?
Yes, they’re great for lunchboxes and picnics, but keep them wrapped to prevent drying out.
Can I make them the night before?
Yes, store them in the fridge wrapped tightly in plastic wrap, but add seaweed just before eating.
How do I prevent rice from sticking to my hands?
Wet or lightly oil your hands before shaping the rice.
Can I make this with leftover rice?
Yes, just make sure the rice is fresh enough and slightly warm for best texture.
Is there a vegan version?
Yes, simply omit the eggs and use tofu scramble instead.
Can I use flavored seaweed snacks?
Yes, flavored seaweed like sesame or wasabi can add extra taste.
What sauces go well with egg onigiri?
Soy sauce, teriyaki, spicy mayo, or sesame dipping sauce pair nicely.
Conclusion
Delicious egg onigiri is an easy, satisfying recipe that combines fluffy scrambled eggs with savory rice and crispy seaweed. Perfect for beginners, this dish can be customized with your favorite flavors and makes a versatile meal any time of day. It’s a quick way to enjoy Japanese-inspired comfort food at home.
Print
Delicious Egg Onigir
5 Stars 4 Stars 3 Stars 2 Stars 1 Star
No reviews
A Japanese-inspired rice ball filled with scrambled eggs, chives, soy sauce, sesame oil, and mayonnaise, then wrapped in seaweed. This delicious egg onigiri is quick to make, portable, and perfect for breakfast, lunch, or snacks.
- Total Time: 25 minutes
- Yield: 4 onigiri (1 serving)
Ingredients
2 eggs
10 g chives (or green onions)
1.5 tbsp mayonnaise
1 sheet roasted seaweed
300 g cooked white rice
2 1/2 tbsp soy sauce
1 tbsp sesame oil
Cooking oil (for scrambling eggs)
Pinch of salt
Instructions
- Wash and finely chop the chives; set aside.
- Crack eggs into a bowl, add a pinch of salt, and whisk.
- Heat a pan over medium heat, coat with cooking oil, and pour in the eggs.
- Scramble gently for 1 minute, breaking into small pieces with a spatula. Remove from heat.
- In a large bowl, combine cooked rice, chives, scrambled eggs, sesame oil, soy sauce, and mayonnaise. Mix well with clean hands or gloves.
- Cut roasted seaweed into small strips (about 5 cm x 8 cm).
- Shape the rice mixture into balls, then flatten slightly and press into a triangular onigiri shape.
- Wrap the bottom of each onigiri with seaweed and serve.
Notes
- Short-grain or sushi rice works best for holding shape.
- Replace chives with parsley, cilantro, or green onions.
- Add chili flakes, sriracha, or wasabi mayo for spice.
- Mix in tuna, chicken, or tofu for extra protein.
- Store tightly wrapped in the refrigerator for up to 2 days; rewrap with fresh seaweed before eating.
- Author: Monica
- Prep Time: 20 minutes
- Cook Time: 5 minutes
- Category: Snack, Lunch, Breakfast
- Method: Mixed & Hand-Shaped
- Cuisine: Japanese
- Diet: Vegetarian
Nutrition
- Serving Size: 1 onigiri
- Calories: 210
- Sugar: 1g
- Sodium: 520mg
- Fat: 9g
- Saturated Fat: 2g
- Unsaturated Fat: 7g
- Trans Fat: 0g
- Carbohydrates: 26g
- Fiber: 2g
- Protein: 7g
- Cholesterol: 95mg


